Struggling with uneven lighting from your floodlights? The wrong beam angle creates dark spots and wasted light. I’ll help you master beam angles for perfect illumination every time.
Choosing the right beam angle involves balancing three things: coverage area, illumination distance, and light intensity. A narrow beam is for distance, while a wide beam covers a large area up close. The goal is to match the angle to the specific task.
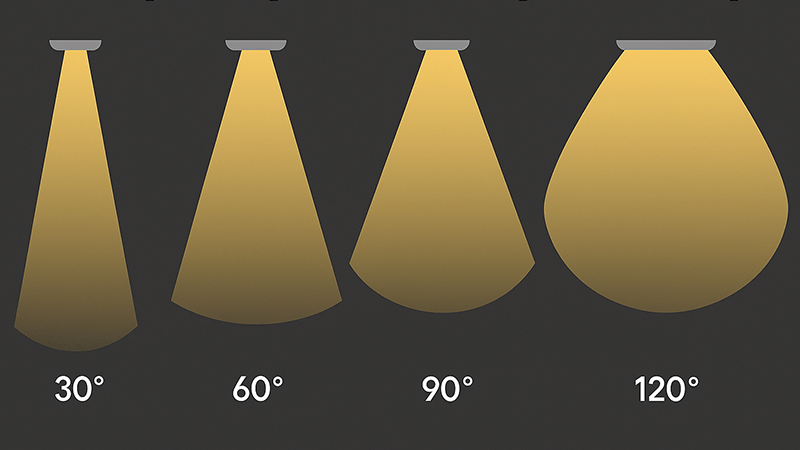
I remember a project early in my career where we used a wide beam angle for a tall flagpole. The light barely reached the top. It was an embarrassing mistake but taught me a valuable lesson about the physics of light. The key is to understand the basics first. This knowledge is fundamental for purchasing managers like Shaz, who need to source the right products for specific project needs. Let’s start with the most basic question.
What Is the Beam Angle of a Flood Light?
Do technical terms like "beam angle" make sourcing lights confusing? A wrong choice means the light doesn’t work as intended. Let me simplify it for you right now.
A floodlight’s beam angle measures how wide the light spreads from the fixture. It’s the angle between the two points where the light’s intensity drops to 50% of its center brightness. A smaller number means a tighter, more focused beam of light.
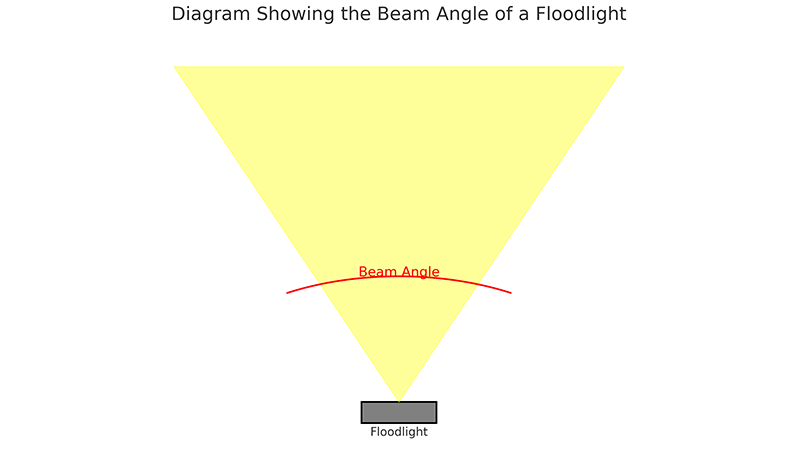
Think of the beam angle like the spray from a flashlight. A narrow, focused beam travels far. A wide, spread-out beam covers a larger area up close. In technical terms, the beam angle is measured where the light intensity falls to 50% of its maximum. This is called the Full Width at Half Maximum (FWHM). This is the industry standard and it represents the useful, bright part of the light. There is also a "field angle," which measures where the light drops to 10% intensity. The field angle is always wider, but the light is much weaker at its edges. For professional projects, we always focus on the beam angle.
Why This Matters for a Purchasing Manager
For a purchasing manager who has to evaluate different suppliers, understanding this is critical. You can look at a specification sheet and know exactly what the product will do. You won’t be misled by a supplier trying to sell a product based on its wider field angle. It allows you to compare different floodlights fairly. This knowledge directly translates to better purchasing decisions and more successful projects. My core principle is simple: put the right light in the right place. That starts with the beam angle.
Common Beam Angle Categories
| Beam Type |
Angle Range |
Common Uses |
| Narrow Spot |
< 25° |
Highlighting architectural columns, tall trees, flagpoles from a distance. |
| Medium Flood |
25° – 60° |
General building facade lighting, area security, illuminating signs. |
| Wide Flood |
> 60° |
Parking lots, sports practice fields, large yards, wide wall washing. |
What Is the Typical Beam Angle for LED Lights?
Are you unsure what a "normal" beam angle is for LED lights? Assuming they are all the same leads to costly mistakes. I’ll show you the typical options available.
LED lights do not have one single "beam angle." They are highly customizable. Common angles for floodlights range from a narrow 10 degrees to a very wide 120 degrees or more. The specific angle is determined by the secondary optics—lenses or reflectors—placed over the LED chip.
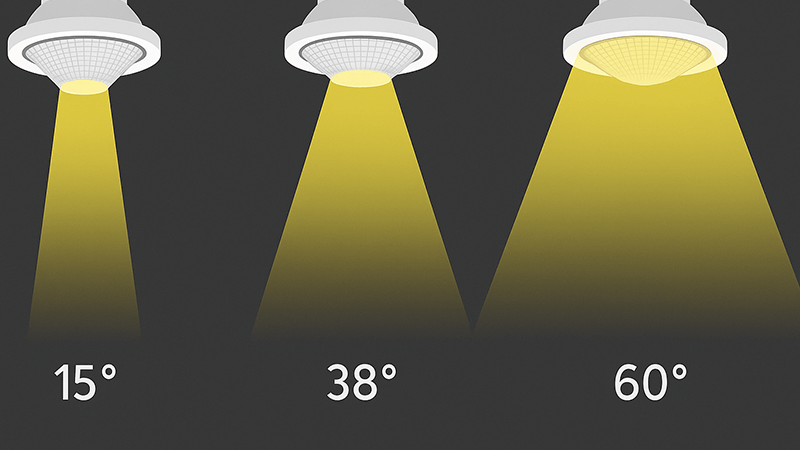
A bare LED chip throws light everywhere, often in a 180-degree pattern. This is not useful for focused illumination. The real work is done by the secondary optics. These are the components that shape the light into a usable beam. As a manufacturer, this is where we focus much of our engineering and design effort.
The Role of Lenses and Reflectors
Modern LED floodlights primarily use two methods to control the beam angle: lenses and reflectors.
Lenses: The most effective method is using Total Internal Reflection (TIR) lenses. These are precision-molded optical components that sit directly over the LED chip. They are incredibly efficient at gathering the light and directing it into a very specific pattern with minimal loss. At iPHD, we use advanced TIR lenses because they give us precise control to create everything from a tight 10-degree spot to a wide 120-degree flood, or even custom asymmetrical shapes.
Reflectors: A reflector is essentially a polished, cone-shaped cup that surrounds the LED chip. The shape and finish of this cup determine how the light is shaped. Reflectors are a simpler technology and can be very effective, but they are often less precise than TIR lenses and can have more "spill light."
Common Angle Categories and Their Applications
The flexibility of LEDs allows us to create lighting tools for any situation. I once helped a client in the UAE who needed to light a perimeter fence next to a residential area. An asymmetric beam was perfect. It pushed the light down and forward onto the fence line, but it cut off the light sharply on the backside, preventing any spill into the neighbors’ windows.
| Category |
Angle |
Intensity & Distance |
Coverage Area |
Best For… |
| Spot |
< 25° |
High intensity, long distance |
Small |
Accenting a statue, lighting a flag from far away, pinpointing details on a tall building. |
| Flood |
25° – 60° |
Medium intensity, medium distance |
Medium |
General security lighting, illuminating building walls, lighting small parking areas. |
| Wide Flood |
60° – 120° |
Lower intensity, short distance |
Large |
Washing a wide wall, lighting a broad yard, illuminating a large work area from a low height. |
| Asymmetric |
Varies |
Varies |
Custom Shape |
Street lighting (directing light onto the road, not into houses), wall washing (even light from top to bottom). |
What Is the Difference Between a 60-Degree and 120-Degree LED Light?
Do 60-degree and 120-degree floodlights seem similar? Choosing the wrong one results in either a dim space or wasted light. Let’s compare them to see the huge difference.
A 60-degree light creates a focused, intense beam, ideal for illuminating objects from a distance. A 120-degree light produces a wide, less intense spread, perfect for covering a large area from a close distance. The choice depends entirely on balancing coverage area with required brightness.
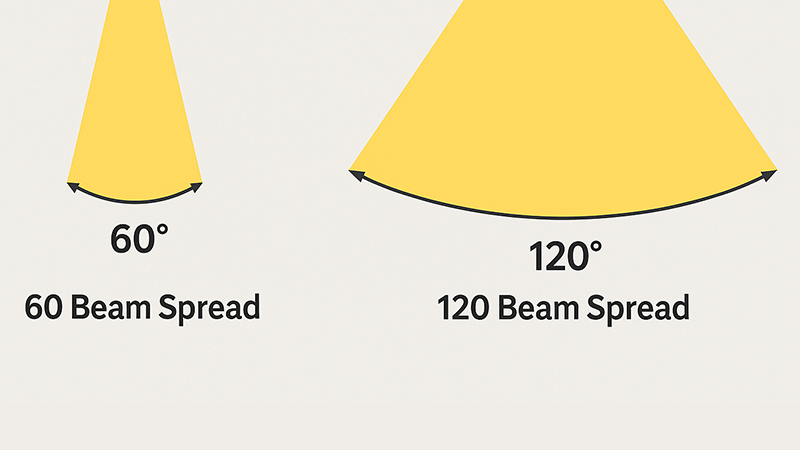
The difference is all about the trade-off between intensity and coverage. Imagine you have a bucket of water. If you pour it out over a small circle, you get a deep puddle. That’s your 60-degree beam—high intensity over a smaller area. If you throw that same bucket of water to cover a large square, the ground only gets damp. That’s your 120-degree beam—low intensity over a larger area. The total amount of light (lumens) from the fixture is the same, but how it’s distributed on the target is completely different.
A Practical Scenario: Lighting a Parking Area
Let’s say you need to light a small commercial parking lot. The light poles are 8 meters high.
- Using 120-degree floodlights: These would be a great choice. Mounted high up, the wide beam would spread out to cover a large area on the ground. You would get broad, even coverage between poles, eliminating dark spots and ensuring the whole area is safe.
- Using 60-degree floodlights: From the same 8-meter pole, the 60-degree beam would create a very bright circle of light directly underneath the pole. However, the areas between the poles would be left in near darkness. You would create "hot spots" and deep shadows, which is bad for security and visibility. The 60-degree light is the wrong tool for this job.
Key Factors in Your Decision
As a purchasing manager, you need to ask your project team two simple questions: "What is the mounting height?" and "How large is the target area?" The answers will guide you.
| Factor |
60-Degree Beam |
120-Degree Beam |
| Light Intensity (Lux) |
Higher. More light is focused on a smaller area. |
Lower. The same amount of light is spread over a larger area. |
| Coverage Area |
Smaller. Good for focused tasks. |
Larger. Good for general illumination of wide spaces. |
| Mounting Distance |
Can be mounted further away from the target to light a specific object. |
Must be mounted closer to the target, or very high up for wide area coverage. |
| Typical Use |
Security cameras, sign lighting, accenting building features. |
Parking lots, large backyards, warehouse interiors, sports areas. |
What Does a 40-Degree Flood Light Mean for My Project?
Seeing a "40-degree" spec can be confusing. What does it mean for your project? Ignoring it can lead to harsh hot spots. This angle is a versatile professional’s tool.
A 40-degree floodlight provides a "medium flood" beam. It offers a great balance between concentrated intensity and decent area coverage. It’s more focused than a standard 60-degree light but wider than a narrow spotlight, making it perfect for general-purpose accent and area lighting.
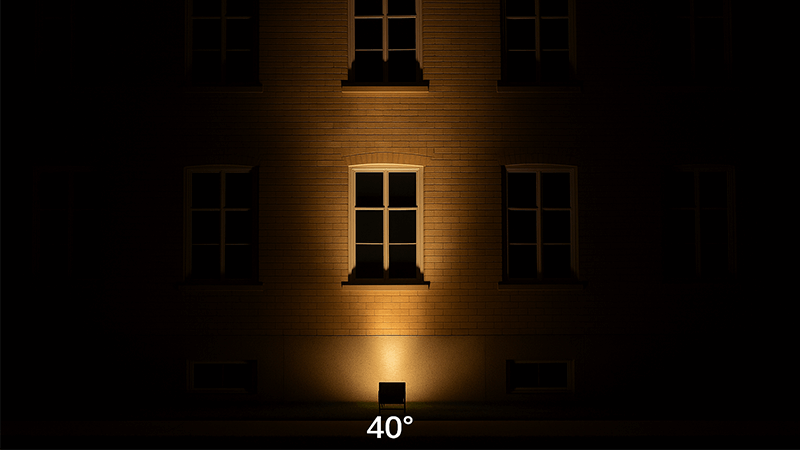
The 40-degree beam is a true workhorse in professional lighting design. It perfectly demonstrates my core philosophy: balancing distance, coverage, and uniformity. It’s not as intense as a 20-degree spot, but its beam is much more useful for covering surfaces. It’s not as wide as a 90-degree flood, but it delivers much more punch and brightness onto the target. I often call it the "Goldilocks" beam because for many applications, it’s just right.
When to Specify a 40-Degree Floodlight
As a buyer, you should see the 40-degree option as a problem-solver. It is often the perfect choice when a narrow spot is too harsh and a wide flood is too weak. I sourced lights for a hotel project in Dubai where the designer wanted to light the architectural pillars. A 20-degree beam created ugly stripes of light. A 60-degree beam washed everything out and hid the details. The 40-degree beam was perfect; it bathed each pillar in a strong, clean wash of light from top to bottom.
Look for these applications:
- Building Facades: Excellent for lighting sections of a wall from a moderate distance. You can use several fixtures to create a beautiful "scalloped" light effect.
- Landscape Lighting: Ideal for lighting up medium-to-large trees. It highlights the entire canopy instead of just one branch.
- Signage: Provides clear, even illumination on a medium-sized sign without excessive light spill.
- Security: Very effective for lighting pathways, entryways, and specific zones where you need bright, controlled light.
Comparing the "Medium" Beam Angles
| Feature |
25° Spot |
40° Flood |
60° Flood |
| Primary Goal |
Accent / Distance |
Balance / General Purpose |
Area Coverage |
| Visual Feel |
Dramatic, High Contrast |
Bright but Smooth |
Soft, Diffuse |
| Best for… |
Tall, thin objects |
Building sections, trees |
Small walls, entryways |
Conclusion
Choosing the right beam angle balances distance, coverage, and brightness. By understanding this, you can select the perfect floodlight for any project and ensure outstanding results every time.