Struggling to get even, bright coverage in a large area? The wrong floodlight placement creates dark spots and wastes energy. This common problem can ruin an entire lighting project.
To calculate the ideal placement for LED floodlights, first determine the required brightness (lux level) for the space. Then, use this, along with the area and the floodlight’s specifications (lumens, beam angle), to calculate the number of lights and their optimal spacing for uniform coverage.
Getting floodlight placement right seems complex. Many factors come into play, from the size of the area to the specific use of the space. You need a clear process to follow. In my years of manufacturing and designing lighting solutions, I’ve developed a straightforward method that I share with partners like you. It breaks down the calculation into simple, manageable steps. This guide will walk you through that exact process, ensuring your next big project is perfectly illuminated. Let’s get started.
Where should LED flood lights be placed?
Placing floodlights incorrectly leads to patchy light and glare. This can be a safety hazard in a commercial yard or a performance issue in a sports arena. It’s a frustrating and costly mistake.
Floodlights should be placed on high poles or building structures around the perimeter of the target area. The key is to position them to create overlapping beams of light, which ensures uniform brightness and minimizes shadows. Aiming angles are critical to direct light where it’s needed.
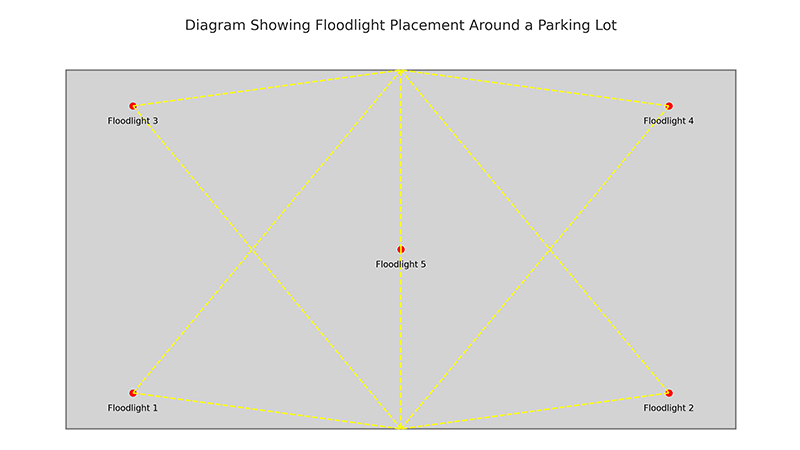
The exact placement of your LED floodlights depends entirely on the application. You can’t use the same layout for a parking lot as you would for a building facade. Each scenario has unique requirements for safety, visibility, and aesthetics. As a manufacturer, I’ve seen countless lighting plans, and the successful ones always start with a deep understanding of the space itself. It’s about more than just mounting lights; it’s about creating a functional and safe environment. Let’s break down the ideal placement strategies for a few common large-scale applications.
Placement by Application
-
Sports Fields & Arenas: For sports lighting, uniformity is everything. You need to eliminate shadows so players and spectators can see the action clearly. Lights are typically mounted on high poles (20-30 meters) along the sides of the field. The goal is to have multiple light sources illuminating any given spot from different angles. This cross-lighting technique is what creates that shadow-free, broadcast-ready look.
-
Parking Lots & Large Yards: Safety and security are the top priorities here. Placement focuses on perimeter lighting with poles spaced evenly to cover the entire area. You’ll want to ensure there is good coverage at entrances, exits, and pedestrian walkways. The mounting height is usually lower than in stadiums, around 8-15 meters, to provide bright, clear light without causing glare for drivers.
-
Building Facades & Architectural Lighting: Here, the goal is aesthetic. You’re using light to highlight architectural features. Floodlights are often mounted on the ground or on lower levels of the building, aimed upwards. This technique, called uplighting, creates dramatic shadows and emphasizes texture. The placement is less about a grid and more about an artistic approach to highlight the building’s best features.
-
Industrial & Construction Sites: These environments are tough. Here, durability is as important as placement. In my experience, for an area with heavy machinery and constant activity, you need robust fixtures. From my own insight, models with an anti-vibration design are essential. I always recommend choosing lights with reinforced aluminum alloy housings and high-temperature resistant silicone seals. This design improves the floodlight’s ability to resist shocks and impacts. It ensures reliable performance, even when things get rough on a construction site. Placement should prioritize key work areas, ensuring they are brightly and safely lit.
| Application Type |
Typical Mounting Height |
Key Placement Strategy |
| Sports Field |
20-30 meters |
High poles at the perimeter for cross-lighting and uniformity. |
| Parking Lot |
8-15 meters |
Evenly spaced poles for complete coverage and security. |
| Building Facade |
Ground level – 5 meters |
Aimed upwards to highlight architectural details. |
| Industrial Site |
6-12 meters |
Focused on work zones, using durable, anti-vibration fixtures. |
How do I calculate how many LED lights do I need?
Guessing the number of lights you need is risky. You could end up with a dimly lit space that’s unsafe, or waste a lot of money on fixtures and energy you didn’t need.
To calculate the number of lights, use this formula: (Target Lux × Area in m²) / (Lumens per Fixture × CU × LLF). This considers the desired brightness, area size, fixture output, and efficiency factors to give you a precise number.
This formula might look a bit technical at first, but it’s the professional standard for a reason. It moves you from guesswork to a data-driven decision. Over the years, I’ve helped many clients, like Shaz in the UAE, use this very calculation to plan large-scale projects accurately. Once you understand what each part of the formula represents, it becomes a powerful tool for planning and budgeting. Let’s dive deeper into each component so you can use it with confidence.
Breaking Down the Lighting Calculation Formula
The formula is your best tool for getting the project right from the start. Let’s examine each variable step-by-step.
Number of Fixtures = (Target Lux × Area) / (Lumens per Fixture × CU × LLF)
- Target Lux (Illuminance): This is simply how bright you want the surface to be. "Lux" is a measure of light intensity over a given area (one lumen per square meter). The required lux level depends on the task being performed in the space. You wouldn’t light a warehouse storage aisle as brightly as a workshop assembly line.
| Area Type |
Recommended Lux Level |
| Parking Lot |
20-50 Lux |
| Warehouse Aisles |
100-150 Lux |
| Workshop / Assembly Area |
300-500 Lux |
| Outdoor Sports Field |
200-750 Lux |
-
Area (m²): This one is straightforward. It is the length multiplied by the width of the space you need to illuminate. Be sure to use square meters for the calculation to work correctly.
-
Lumens per Fixture: This value is provided by the manufacturer. It tells you the total amount of light the floodlight produces. A higher lumen number means a brighter light. For large areas, you’ll typically be looking at floodlights that produce anywhere from 15,000 to over 100,000 lumens.
-
Coefficient of Utilization (CU): This factor accounts for how efficiently light from the fixture reaches the target surface. It considers things like the room’s shape, surface reflectiveness, and the light’s beam angle. A wider beam in an open space has a higher CU than a narrow beam in a cluttered room. This value is usually between 0.4 and 0.8, and it’s often provided in the manufacturer’s photometric data.
-
Light Loss Factor (LLF): No light stays at 100% brightness forever. The LLF accounts for the gradual decrease in light output over time due to factors like dirt accumulation (lumen dirt depreciation) and the natural aging of the LEDs (lumen maintenance). A typical LLF is around 0.8 to 0.9, meaning you plan for the lights to be operating at 80-90% of their initial output. This ensures your space will still meet the target lux level years down the line. I always advise my clients to plan for this—it’s about ensuring long-term quality.
What is the spacing criterion for LED lights?
If you space your floodlights too far apart, you get dark, uneven patches. Place them too close, and you create overly bright "hot spots" while wasting money on unnecessary fixtures.
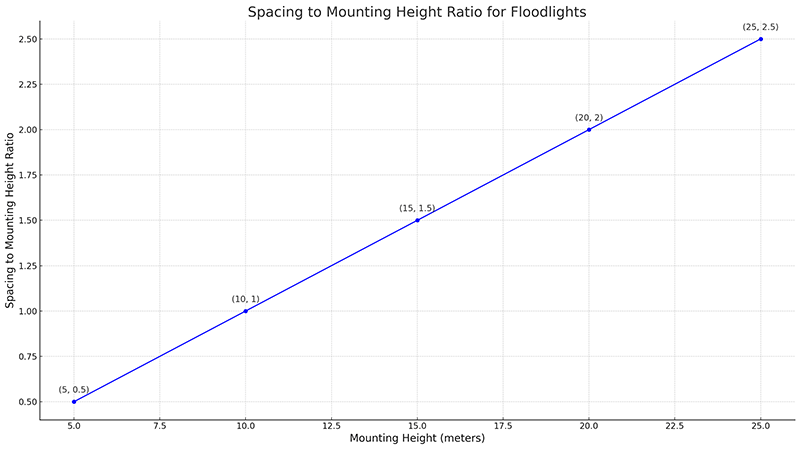
The primary spacing criterion is the Spacing-to-Mounting-Height (S/MH) ratio. This ratio, provided by the manufacturer, guides the maximum distance between fixtures relative to their height to achieve uniform light distribution. Generally, the ratio is around 1.0 to 2.0.
Understanding the S/MH ratio is fundamental for creating a professional lighting layout. It’s the technical guide that prevents those common spacing mistakes. The ratio directly connects the floodlight’s design—specifically its beam angle—to how it should be installed in the real world. In all the years I’ve worked with project managers, explaining this concept has been a breakthrough moment. It transforms the layout from a random grid into a calculated, efficient system. Let’s explore how this ratio works and how it relates to beam angle to achieve that perfect uniformity.
Mastering the Spacing-to-Mounting-Height (S/MH) Ratio
The S/MH ratio is a simple yet effective guideline. If a floodlight has an S/MH ratio of 1.5 and you mount it at a height of 10 meters, the maximum recommended spacing between that fixture and the next one is 15 meters (1.5 × 10 meters). Spacing them further apart than 15 meters would likely result in a dark area between them.
The beam angle of the floodlight is the main factor that determines its S/MH ratio. The relationship is quite direct:
-
Narrow Beams (e.g., 15°-30°): These beams concentrate light into a tight, intense spot. They are designed to travel long distances, making them ideal for lighting tall building facades or specific objects from far away. Because the light is so focused, they have a lower S/MH ratio, usually below 1.0. You need to place them closer together to get overlapping, even coverage.
-
Medium Beams (e.g., 40°-60°): This is a versatile, all-purpose beam angle. It provides a good balance between intensity and coverage area. These are very common for general-purpose floodlighting in areas like parking lots or work yards. They typically have an S/MH ratio around 1.0 to 1.5.
-
Wide Beams (e.g., 90°-120°): These beams spread the light out over a very large area. They are perfect for lighting wide spaces from a relatively low mounting height. Since they distribute light so broadly, they have a higher S/MH ratio, often approaching 2.0.
Choosing the right beam angle and adhering to the corresponding S/MH ratio is the key to achieving high uniformity. Uniformity is simply a measure of how evenly the light is distributed across a surface. Good uniformity isn’t just about looks; it enhances safety and visibility, which is critical in any large-scale project. I always tell my clients to check the datasheet for the S/MH ratio—it’s a small number that makes a huge difference in the final result.
How to estimate a lighting layout?
You’ve calculated how many lights you need, but how do you arrange them on a plan? Just placing dots on a blueprint without a system can lead to a chaotic and ineffective installation.
To estimate a lighting layout, use lighting design software like DIALux for a precise photometric simulation. For a simpler estimate, draw a grid over your site plan and place fixtures according to the calculated spacing, ensuring full coverage and beam overlap.
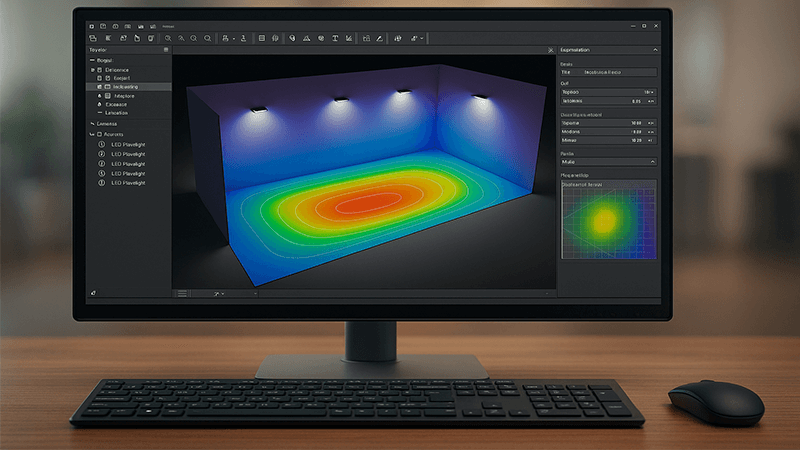
Creating the final layout is where all the calculations come together. It’s the visual map that guides the installation team. A good layout ensures that your theoretical calculations translate into real-world success. While manual methods can work for simple, rectangular areas, I’ve seen firsthand how powerful software simulations are for complex projects. They allow you to test and refine the design before a single fixture is purchased, saving immense time and money. Here’s a closer look at both methods.
From Calculation to a Visual Plan
Finalizing your lighting layout is the last crucial step. You can approach this in two ways: a manual grid method or using professional software.
1. Manual Grid Layout Method
This is a great for quick estimates of simple, open areas like a rectangular parking lot.
- Draw the Area to Scale: Start with a simple drawing of the space, including dimensions.
- Determine Your Grid: Based on your S/MH calculation, you know the maximum spacing between lights. For example, if your mounting height is 10 meters and the S/MH ratio is 1.5, your spacing is 15 meters. You will create a 15m x 15m grid over your drawing.
- Place the Fixtures: Place a light at each intersection of the grid lines. You might need to adjust the positions near the edges to ensure the perimeter is well-lit.
- Review Coverage: Visualize the light cones from each fixture. The goal is to have the edges of the light beams overlap slightly. This ensures there are no dark spots. This method is fast but lacks precision and can’t easily account for obstacles or complex shapes.
2. Lighting Design Software (e.g., DIALux, RELUX)
For any significant project, I strongly recommend using lighting design software. This is what professionals use.
- Accuracy: The software uses IES files, which are provided by the manufacturer and contain the exact photometric data for a specific floodlight. It allows you to build a 3D model of your space—whether it’s a stadium or a complex industrial site.
- Simulation: You can place virtual fixtures in the model and the software will run a simulation. It generates a detailed report showing the exact lux levels at every point in the area, creating color-coded visuals that show brightness and uniformity.
- Optimization: You can easily experiment with different fixture types, beam angles, mounting heights, and aiming angles. You can see the impact of any change instantly. I worked on a project for a large port in Dubai where the client was unsure about the layout. Using DIALux, we were able to provide three different simulation options. The client could see exactly what the final result would look like, which gave them the confidence to approve the purchase. This is the difference between guessing and knowing.
Conclusion
Properly calculating your LED floodlight placement is key. By using the right formulas and understanding spacing ratios, you can create an efficient, uniform, and safe lighting design for any large space.