Last Updated on: September 6, 2025Choosing the wrong floodlight beam angle can ruin your project with ugly hot spots or weak light. This costly mistake disappoints clients and wastes money. It’s time to look past the spec sheet.
A narrow beam floodlight uses focused optics (under 45°) to project light over long distances, perfect for accenting tall features. A wide beam floodlight (over 60°) spreads light over a larger area at closer ranges, ideal for general illumination like parking lots or building facades.
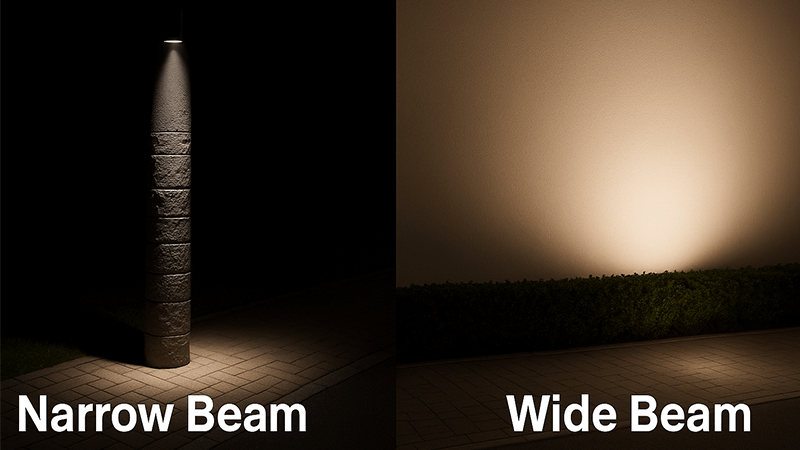
Understanding this basic difference is just the start. As a manufacturer, I’ve seen countless projects where purchasing managers, even experienced ones like Shaz, were misled by incomplete data. The real secrets to a perfect lighting outcome are hidden in the details that many suppliers won’t tell you about. Let’s dive into what you really need to know to make the right choice every time and ensure your projects shine.
What Does a ‘Beam Angle’ on a Spec Sheet Really Tell You?
You’re comparing two floodlights, and both spec sheets claim a 30° beam angle. You assume they’re identical. But after installation, one produces a beautiful, even light, while the other creates a blotchy mess. The spec sheet didn’t tell you the whole story.
A product’s stated beam angle isn’t a guarantee of quality. It’s crucial to know how it’s measured and to verify the quality of the light spot it produces, as low-grade optics can create uneven lighting despite having the "correct" angle.
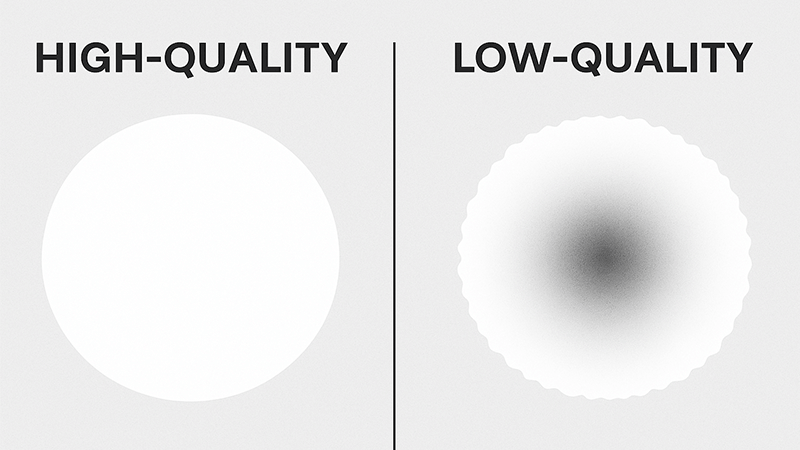
When my journey in the lighting industry began on the factory floor, I quickly learned that not all beam angles are created equal. The standard, honest way to define a beam angle is the point where the light’s intensity drops to 50% of its center maximum. So, a 50° beam angle means the light intensity at ±25° from the center is half of the brightest point. However, I’ve seen less reputable suppliers use a 10% intensity value. This makes their beam angle number look bigger and more impressive, suggesting wider coverage. In reality, this often means the light is scattered and lacks a bright, functional center. It’s a numbers game designed to mislead.
The quality of the light produced is even more critical. This is determined by the optics—the lens or reflector inside the fixture.
| Optic Quality |
High-Quality Lens/Reflector |
Low-Quality Lens/Reflector |
| Light Spot |
Uniform brightness from center to edge. |
Dark "hole" or shadow in the center. |
| Edge |
Soft, feathered, and smooth transition to darkness. |
Jagged, uneven "bat wing" shape or hard edge. |
| Stray Light |
Minimal light spill outside the main beam. |
Significant glare and secondary "ghost" rings. |
A great floodlight with a 30° beam will cast a clean, round, and uniform circle of light. A poor one with the same 30° rating can produce a nightmare spot with dark patches, weird shapes, and distracting stray light. From my experience helping clients source products, I can tell you that suppliers of low-quality lights will almost never show you an actual, unedited photo of the light spot against a wall. They’ll only show you the fixture itself. As a purchasing professional, you should always ask for real-world beam shots or, even better, the IES file to run your own simulations. This simple step separates the professional suppliers from the rest.
How Do You Match the Right Beam Angle to Your Project’s Distance?
You have a perfect project: illuminating a beautiful 10-meter-wide company logo on a wall from 20 meters away. You pick a floodlight, but the beam angle is a wild guess. The result is a tiny, overly bright hot spot that makes the logo unreadable, completely missing the mark.
To choose the correct beam angle, you must calculate it based on the installation distance and the desired coverage area. A simple rule is to use narrow beams for far targets and wide beams for close ones, but precision requires calculation.
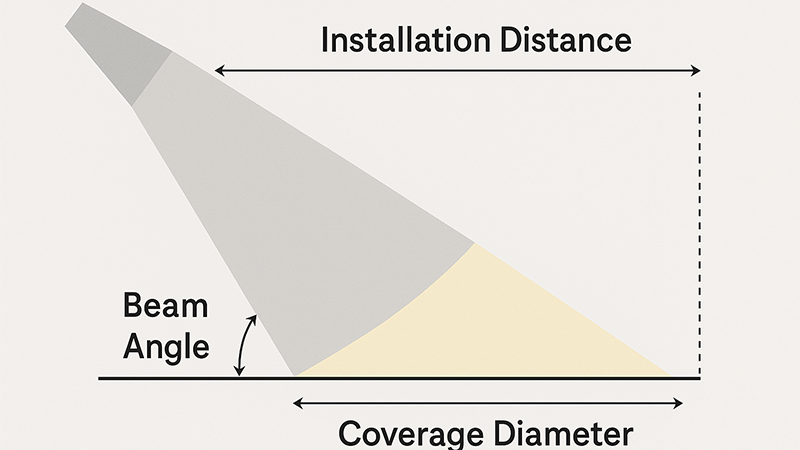
This is one of the most common and costly mistakes I see in lighting design. People buy a powerful, high-quality floodlight but choose the wrong beam angle, and the entire effect is ruined. The good news is that you don’t have to guess. The relationship between distance, coverage area, and beam angle is based on simple trigonometry. While you can use online calculators, a basic understanding helps you evaluate specs quickly. Here’s a simplified way to think about it:
Imagine a triangle formed by the floodlight and the edges of the area you want to light up. The floodlight is the point, the distance to the wall is the height, and the lit area is the base.
Let’s use our example:
- Distance (D): 20 meters
- Target Width (W): 10 meters
The formula is: Beam Angle ≈ 2 × arctan(W / (2 × D))
So for our project:
Beam Angle ≈ 2 × arctan(10 / (2 × 20))
Beam Angle ≈ 2 × arctan(10 / 40)
Beam Angle ≈ 2 × arctan(0.25)
Beam Angle ≈ 2 × 14.04°
Beam Angle ≈ 28°
In this case, a floodlight with a 30° beam angle would be the perfect choice. A 10° beam would be too small and intense, while a 60° beam would spill light far beyond the logo, wasting energy and reducing the visual impact. I always advise my clients, like Shaz, to map this out before placing a bulk order. It avoids so many headaches later. Here is a quick reference table I’ve developed over the years to help my partners make faster initial decisions.
| Desired Coverage |
Distance: 5m |
Distance: 10m |
Distance: 20m |
Distance: 30m |
| 2m Wide Spot |
~23° |
~11° |
~6° |
~4° |
| 5m Wide Spot |
~53° |
~28° |
~14° |
~9° |
| 10m Wide Spot |
~90° |
~53° |
~28° |
~19° |
This table clearly shows that as the distance to your target increases, you need a progressively narrower beam angle to maintain the same size of light coverage.
How Do You Place Floodlights to Avoid Ugly Dark Spots or Overlaps?
You’ve installed a row of high-quality floodlights to wash a long wall with light. But when you switch them on, the result is a striped mess. Bright, overlapping circles create hot spots, while dark, scalloped gaps ruin the visual continuity.
To create a uniform wash of light, the spacing between fixtures must be calculated based on their beam angle and setback distance. Simply spacing them at equal intervals without considering the optics will lead to an uneven, unprofessional result.
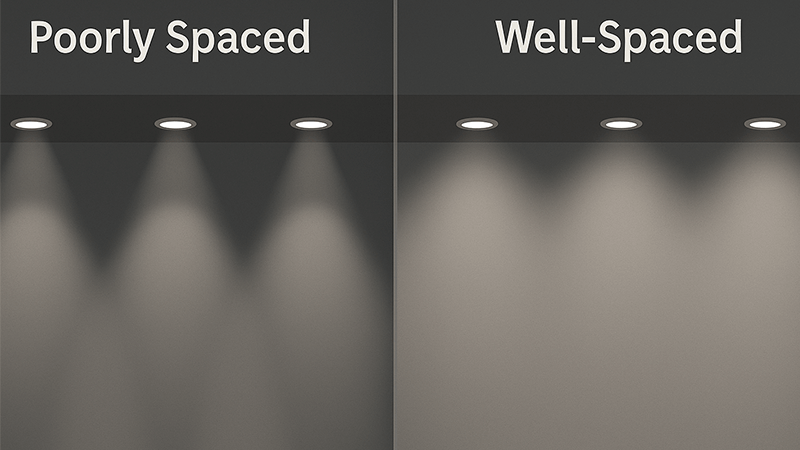
When working with a new project contractor, this is a topic I always bring up early. They’ve correctly calculated the beam angle for the height they want to illuminate, but they haven’t planned for the "blending distance" between fixtures. Achieving a smooth, even wall wash isn’t just about pointing lights at a wall; it’s about making the individual beams overlap perfectly so the human eye doesn’t perceive the transition from one light to the next.
The key is the relationship between the setback distance (how far the lights are from the wall) and the spacing distance (how far the lights are from each other). A common rule of thumb for wall washing with medium or wide beams is a 1:1 ratio. If your lights are installed 2 meters away from the wall, you should space them 2 meters apart. This allows the edges of each beam, where the intensity is about 50%, to overlap and create a visually uniform brightness across the surface.
However, this rule changes with narrower beams. A narrow 15° beam has a much harder, more defined edge. If you use a 1:1 spacing rule, you will almost certainly see distinct, overlapping circles or dark gaps. For these applications, the lights may need to be spaced much closer together, or you might need a different optical solution, like a wall-washing lens that shapes the light vertically and horizontally. This is where partnership with a knowledgeable manufacturer becomes invaluable. At my company, iPHD, we don’t just sell lights. We help our partners by running lighting simulation reports using software like DIALux. We input the project dimensions, select the right fixture and beam angle, and then test different layouts to find the optimal spacing. This ensures the final result is flawless before a single fixture is even installed.
Which Beam is the ‘Best’ and How Do You Avoid Blinding People?
You need to powerfully illuminate an architectural feature, so you choose a floodlight with a very narrow, intense beam. The feature looks great, but anyone walking past the area is blinded by severe, uncomfortable glare. Your powerful lighting has become a public nuisance.
There is no single "best" floodlight; the best choice is always relative to the application. The key is to match the beam angle to the goal while considering mounting height to control glare and ensure visual comfort.
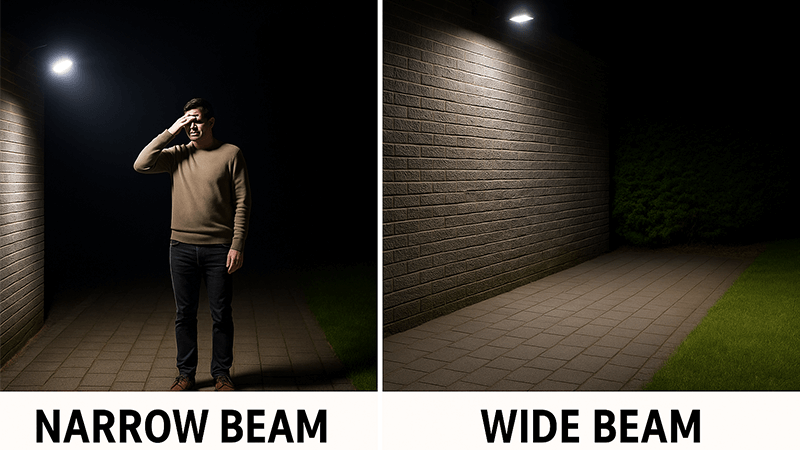
I often get asked, "Michael, which is your best floodlight?" My answer is always the same: "Tell me what you are trying to do." The "best" light for illuminating the top of a 50-meter-tall flagpole is completely a wrong choice for lighting a garden pathway. This lesson is about balancing performance with human experience, and the conflict between narrow angles and glare is a perfect example.
A narrow beam angle (like 10° or 15°) concentrates a huge amount of light into a tiny spot. This is fantastic for making an object pop from a very long distance. However, if that fixture is mounted at a low height—say, at ground level to light up a short wall—that intense beam can easily travel directly into people’s eyes. This creates what we call disabling glare. It’s not just annoying; it can be dangerous.
In contrast, a wide beam angle (like 60° or 90°) is ideal for lower mounting heights and general area lighting. It spreads the light out, reducing the intensity at any single point. This creates a much softer, more comfortable ambiance. It’s perfect for patios, parking areas, and general facade lighting where people might be near the fixtures.
To help my partners like Shaz make the right call, I use a simple framework to guide their selection:
| Beam Angle Category |
Typical Angle Range |
Primary Use Case |
Glare Factor |
| Very Narrow Spot |
< 15° |
Flagpoles, tall columns, accenting details >30m away. |
Very High: Use only when aimed away from people. |
| Narrow Spot |
15° – 30° |
Building accents, statues, tree uplighting. |
High: Best for distant targets or careful aiming. |
| Flood |
30° – 60° |
General wall washing, building facades, small areas. |
Medium: Versatile, but consider mounting height. |
| Wide Flood |
60° – 120° |
Parking lots, sports fields, large area illumination. |
Low: Ideal for general lighting and human comfort. |
Ultimately, choosing the ‘best’ beam isn’t about finding the most powerful or most focused light. It’s about choosing the smartest light for the job—one that achieves the desired visual effect without compromising the comfort and safety of the people who will be using the space.
Conclusion
Choosing the right beam angle goes beyond the spec sheet. It requires understanding optics quality, calculating for distance, and planning for placement to create effective, comfortable, and truly impressive lighting designs.